Vance's e-Zguide to creating simple HTML files (in Notepad, or any text editor)
Microskills for Web Spinning: Housekeeping awareness and Web design considerations
Navigate this site
![]() Start over | Browse
Index
Start over | Browse
Index ![]() |
On to Step 1
|
On to Step 1
![]()
Here are some things you need to be aware of about creating HTML files and making web pages ...
Create a work space | Make Windows show you the file extensions in folders |
Give your files and folders names that will work on the
Internet | Work in Notepad and view the result in your
browser | Save your work correctly |
Establish your web presence | Learn
more with the HTML Tutorial
Create a work
space just for your Web projects
|
Set up a proper work area. Create a folder where all your web pages can be placed as in the example below. |
Note to students at the PI: Create the following in your HOME folders. |
Set aside some space on your computer
 |
Call your teacher to have a look when you've set up your MyHTML folder properly. |
Create a work space | Make Windows show you the file
extensions in folders | Give your files and folders
names that will work on the Internet | Work in Notepad
and view the result in your browser | Save your work
correctly | Establish your web presence |
Learn more with the HTML Tutorial
This is IMPORTANT: Make Windows show you the file
extensions of documents you are looking at!
A file name has two parts. Normally, there is only one period or full stop in a file name. In this case what we consider to be the file name comes to the left of the period, and its extension is to the right.
An extension tells the computer what application to use to open the file by default. In fact, you can change what applications are associated with certain extensions, and when you install a program it sometimes associates itself with certain extensions so that it will be used to open files with those extensions. This may or may not be what you want, so you have to watch this when installing programs.
Here is a chart that shows some common extensions and what programs are normally used to open files with those extensions.
| Extension A file with this extension |
Associated
Application is normally opened with one of these applications |
| htm / html | Internet Explorer / Netscape / Opera |
| doc | Microsoft Word |
| xls | Microsoft Excel |
| ppt | Microsoft PowerPoint |
| jpg / gif / bmp | a photo editor or multimedia program |
| mpg / avi / wmp | Quicktime or Windows Media Player or some other multimedia program |
| exe / com / pif | Files with these extensions are very powerful - they will run as their own applications and will do whatever the programmer told them to do. Make sure you trust them before launching them |
Windows is set up (by default) so that when you look in a folder, you don't see the extensions. You just see the file name. This is both dangerous and annoying. It's dangerous because people wanting to damage your computer sometimes send attachments that look harmless because their true extensions are hidden. For example, someone might send you a file that looks like lookhere.jpg when its real name (extension hidden by default) is lookhere.jpg.exe !!! Watch out for that one!!
Hidden extensions can be annoying if you are trying to create a file that opens in a certain application but when you save it the application gives it an extension that you don't see. For example, suppose you are in Notepad writing HTML code which you want to save as a file with the name mycode.html . You know that if you click on an icon with an htm or html extension, it will open automatically in a brower, which is what you want it to do. However, when you look in your folder for the html file you just created, you don't see it.
![]()
 |
The problem is you can't see the full extension of the file mywebpage.html.txt. Here is how to fix it.
|
Create a work
space | Make Windows show you the file extensions in
folders | Give your files and folders names that will work on the Internet
| Work in Notepad and view the result in your browser
| Save your work correctly | Establish your web presence | Learn
more with the HTML Tutorial
Give your
files and folders names that will work on the Internet
It's important to think in advance about file and folder names you use. Your local computer and LAN environment might be very flexible in what it allows as file names, and links might work fine when tested on your computer. BUT these same names may not be allowed on the Internet and might cause confusion later if proper nomenclature isn't used right from the time you start your project. Some file names might not be allowed on the Internet at all (maybe files containing certain characters can't be uploaded to your Internet host site, for example). Other files names might be allowed but can cause problems later (file names with spaces for example).
Take this quiz:
Are the file names below ok? If not, why not??
| 1. |
my life.html |
||
| 2. |
my1stwebpage.html |
||
| 3. |
ahmed's1stwebpage.htm |
||
| 4. |
forty-nine_reasons.htm |
||
| 5. |
39steps(version1).htm |
||
| 6. |
PetroleumInstitute04.html |
||
| 7. |
don't_click_here.htm |
||
| 8. |
4&20blackbirds.htm |
||
| 9. |
fire_and_ice.html |
||
| 10. |
31-dalmations ver02.htm |
||
Create a work space |
Make Windows show you the file extensions in folders
| Give your files and folders names that will work on
the Internet | Work in Notepad and view the result in your browser |
Save your work correctly | Establish
your web presence | Learn more with the HTML
Tutorial
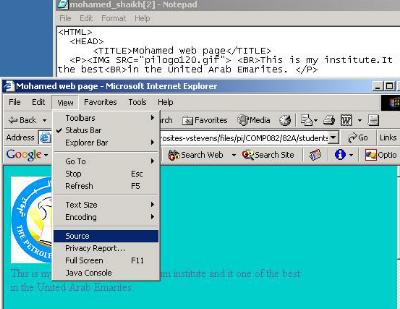
Start your HTML code in Notepad
and refresh your browser to see the results
|
|
Reopen your file in View / Source, work on the code in Notepad, and refresh your browser to see the results
Here's how you resume work on an HTML document that you created earlier
 |
|
Helpful Hint:
If you make changes in Notepad and save them but don't see the result when you refresh your browser, maybe you are not viewing the browser window for that Notepad. If in doubt, close the Notepad source file, select View / Source in the browser window you are trying to work on, and continue working on the code that comes up in the new Notepad window.
Create a work space |
Make Windows show you the file extensions in folders
| Give your files and folders names that will work on
the Internet | Work in Notepad and view the result in
your browser | Save your work correctly | Establish
your web presence | Learn more with the HTML
Tutorial
IMPORTANT Information about
Opening and SAVING your work from a browser window
Suppose you see a version of your work on a network computer and you want to be sure you will work on that copy for your revisions. You see your work by opening it in a browser from its network location. To keep a copy, you'll need to save it on your computer from the browser. There is a right way and a very wrong way to do that.
|
Study the diagram at right -->
|
|
QUESTION: When viewing an HTML document in Internet Explorer, which is the best way to save the html file on your computer? Choose the best answer below:
| In IE, use File / Save As to make a copy of
the file on your computer. You can open the HTML file in Notepad later and work
on it. |
|
| In IE, use View / Source to open the
document code directly in Notepad, and then save the Notepad file as an HTML
document. You can work on the file right then in Notepad, or open the saved
file in Notepad later and work on it then. |
|
| In IE, use Edit / Select All, then use
control C to copy, and then paste everything into a Word document, and save
that as HTML. You can open the file later in Word and keep saving it as
HTML. |
Create a work space |
Make Windows show you the file extensions in folders
| Give your files and folders names that will work on
the Internet | Work in Notepad and view the result in
your browser | Save your work correctly | Establish
your web presence | Learn more with the HTML
Tutorial
Putting your work on the
Internet: Start a Blog or Wiki, or
Set up your own Web site
There are two ways to quickly establish a 'web presence.' The fastest way is to start a blog, and the other is to create a few pages in HTML and upload them to a free web hosting service. Let's look at each of these:
If you're really keen, get yourself some free web space at Geocities or Tripod and upload the files you create there. There's more information about getting started with Geocities and Tripod here.
Here is what you do to get files that work on your computer up onto your web site:
How do you move your files from your computer to the internet?
If you include all the files (html and image files esp) and keep the same file structure and folder/file relationship between each file in your project, then everything that works on your local drive should work the same on the Internet.
Create a work space |
Make Windows show you the file extensions in folders
| Give your files and folders names that will work on
the Internet | Work in Notepad and view the result in
your browser | Save your work correctly |
Establish your web presence | Learn more with the HTML
Tutorial
Ready for more?? Work through
the HTML Tutorial ...
Navigate this site
![]() Start over | Browse
Index
Start over | Browse
Index ![]() |
On to Step 1
|
On to Step 1
![]()
|
|
For comments, suggestions, or further information
on this page, |
Copyright 2008 by Vance Stevens
under Creative
Commons License: http://creativecommons.org/licenses/by-nc-sa/2.5/